Templates for Organizing Projects Effectively

In our last week’s roundup post, we shared several templates specifically designed for UX designers, product managers, project managers, and HR professionals.

This week, we have five new templates which are useful for organizing projects effectively. These templates will help project teams with planning, mapping, managing, and executing various tasks.

Explore our diagram community to discover a wide range of industry-specific templates and examples that can assist you in efficiently managing your daily tasks.

This week’s templates include:

Project Proposal Template

The project proposal template is designed to streamline project planning and organization. This template provides a structured framework to outline your project’s objectives, scope, resources, and timeline. By utilizing this template, you can effectively communicate project ideas and strategies to stakeholders, ensuring clarity and alignment from the very beginning.

Here’s how to use the project proposal template:

  1. Introduction: Begin by introducing your project proposal. Clearly state the project’s purpose, goals, and expected outcomes. This section should provide an overview that captures the reader’s attention and highlights the project’s significance.
  2. Project details: Provide a comprehensive description of the project. Define its scope, key features, and deliverables. Specify the resources required, including personnel, budget, and equipment. This step ensures everyone understands what the project entails.
  3. Timeline: Outline the project’s timeline from start to finish. Break down the major milestones and their respective deadlines. This helps in visualizing the project’s progression and managing time effectively.
  4. Methodology: Explain the approach you’ll take to complete the project. Describe the methods, tools, and techniques you’ll employ. This section demonstrates your preparedness and expertise in handling the project’s challenges.
  5. Conclusion: Sum up your proposal by reiterating the project’s benefits and alignment with strategic goals. Address potential risks and mitigation strategies. Encourage feedback and questions to foster collaboration and refine your proposal.

Click on the image to edit the project proposal template

Work Breakdown Structure

The work breakdown structure (WBS) template assists with effectively organizing complex projects. It breaks down a project into smaller, manageable tasks, allowing professionals to allocate resources, track progress, and ensure efficient project execution.

5 simple steps to use the work breakdown structure:

  1. Project basics: Start by explaining the project’s main goal and why it matters. Briefly introduce the project’s scope and objectives to give context.
  2. Main phases: Divide the project into big phases or key parts. These are like the main chapters of your project. List them at the top level.
  3. Break into tasks: Under each phase, break the work into smaller tasks. These are the specific to-do items that need to get done. Arrange them in a list to show what needs to happen.
  4. Assign who does what: Say who is responsible for each task. Clearly show who is in charge of each thing. This helps everyone know who does what.
  5. Time and order: Estimate how long each task might take and if any tasks depend on others. This helps plan the order of tasks and when they should happen.

Click on the image to edit the work breakdown structure

Problem Prioritization Template

The problem prioritization template helps make informed decisions by identifying and ranking problems or challenges. This template enables efficient allocation of resources and focus on the most critical issues, leading to effective project management with innovative elements like the sailboat, Cynefin, problem categorization, and “I like, I wish, I wonder” approaches, this template offers a holistic view of project issues.

5 simple steps to use the problem prioritization template:

  1. Identify challenges: Start by listing the challenges your project faces. Be comprehensive in noting down the obstacles and issues.
  2. Sailboat visualization: Use the sailboat graphic to visualize your project’s “winds” (positive forces) and “anchors” (negative factors). This helps you understand what propels your project forward and what holds it back.
  3. Cynefin framework: Categorize problems into the Cynefin framework’s domains: Simple, Complicated, Complex, and Chaotic. This categorization guides you in choosing suitable strategies for each problem type.
  4. Problem categorization: Utilize the problem categorization template to sort challenges into different categories based on their nature. This helps you focus on addressing similar challenges together.
  5. “I Like, I Wish, I Wonder”: Encourage team collaboration by using the “I like, I wish, I wonder” approach. Team members share what they appreciate, what they want to improve, and what questions they have about the project. This fosters open communication and generates insights.

Click on the image to edit the problem prioritization template

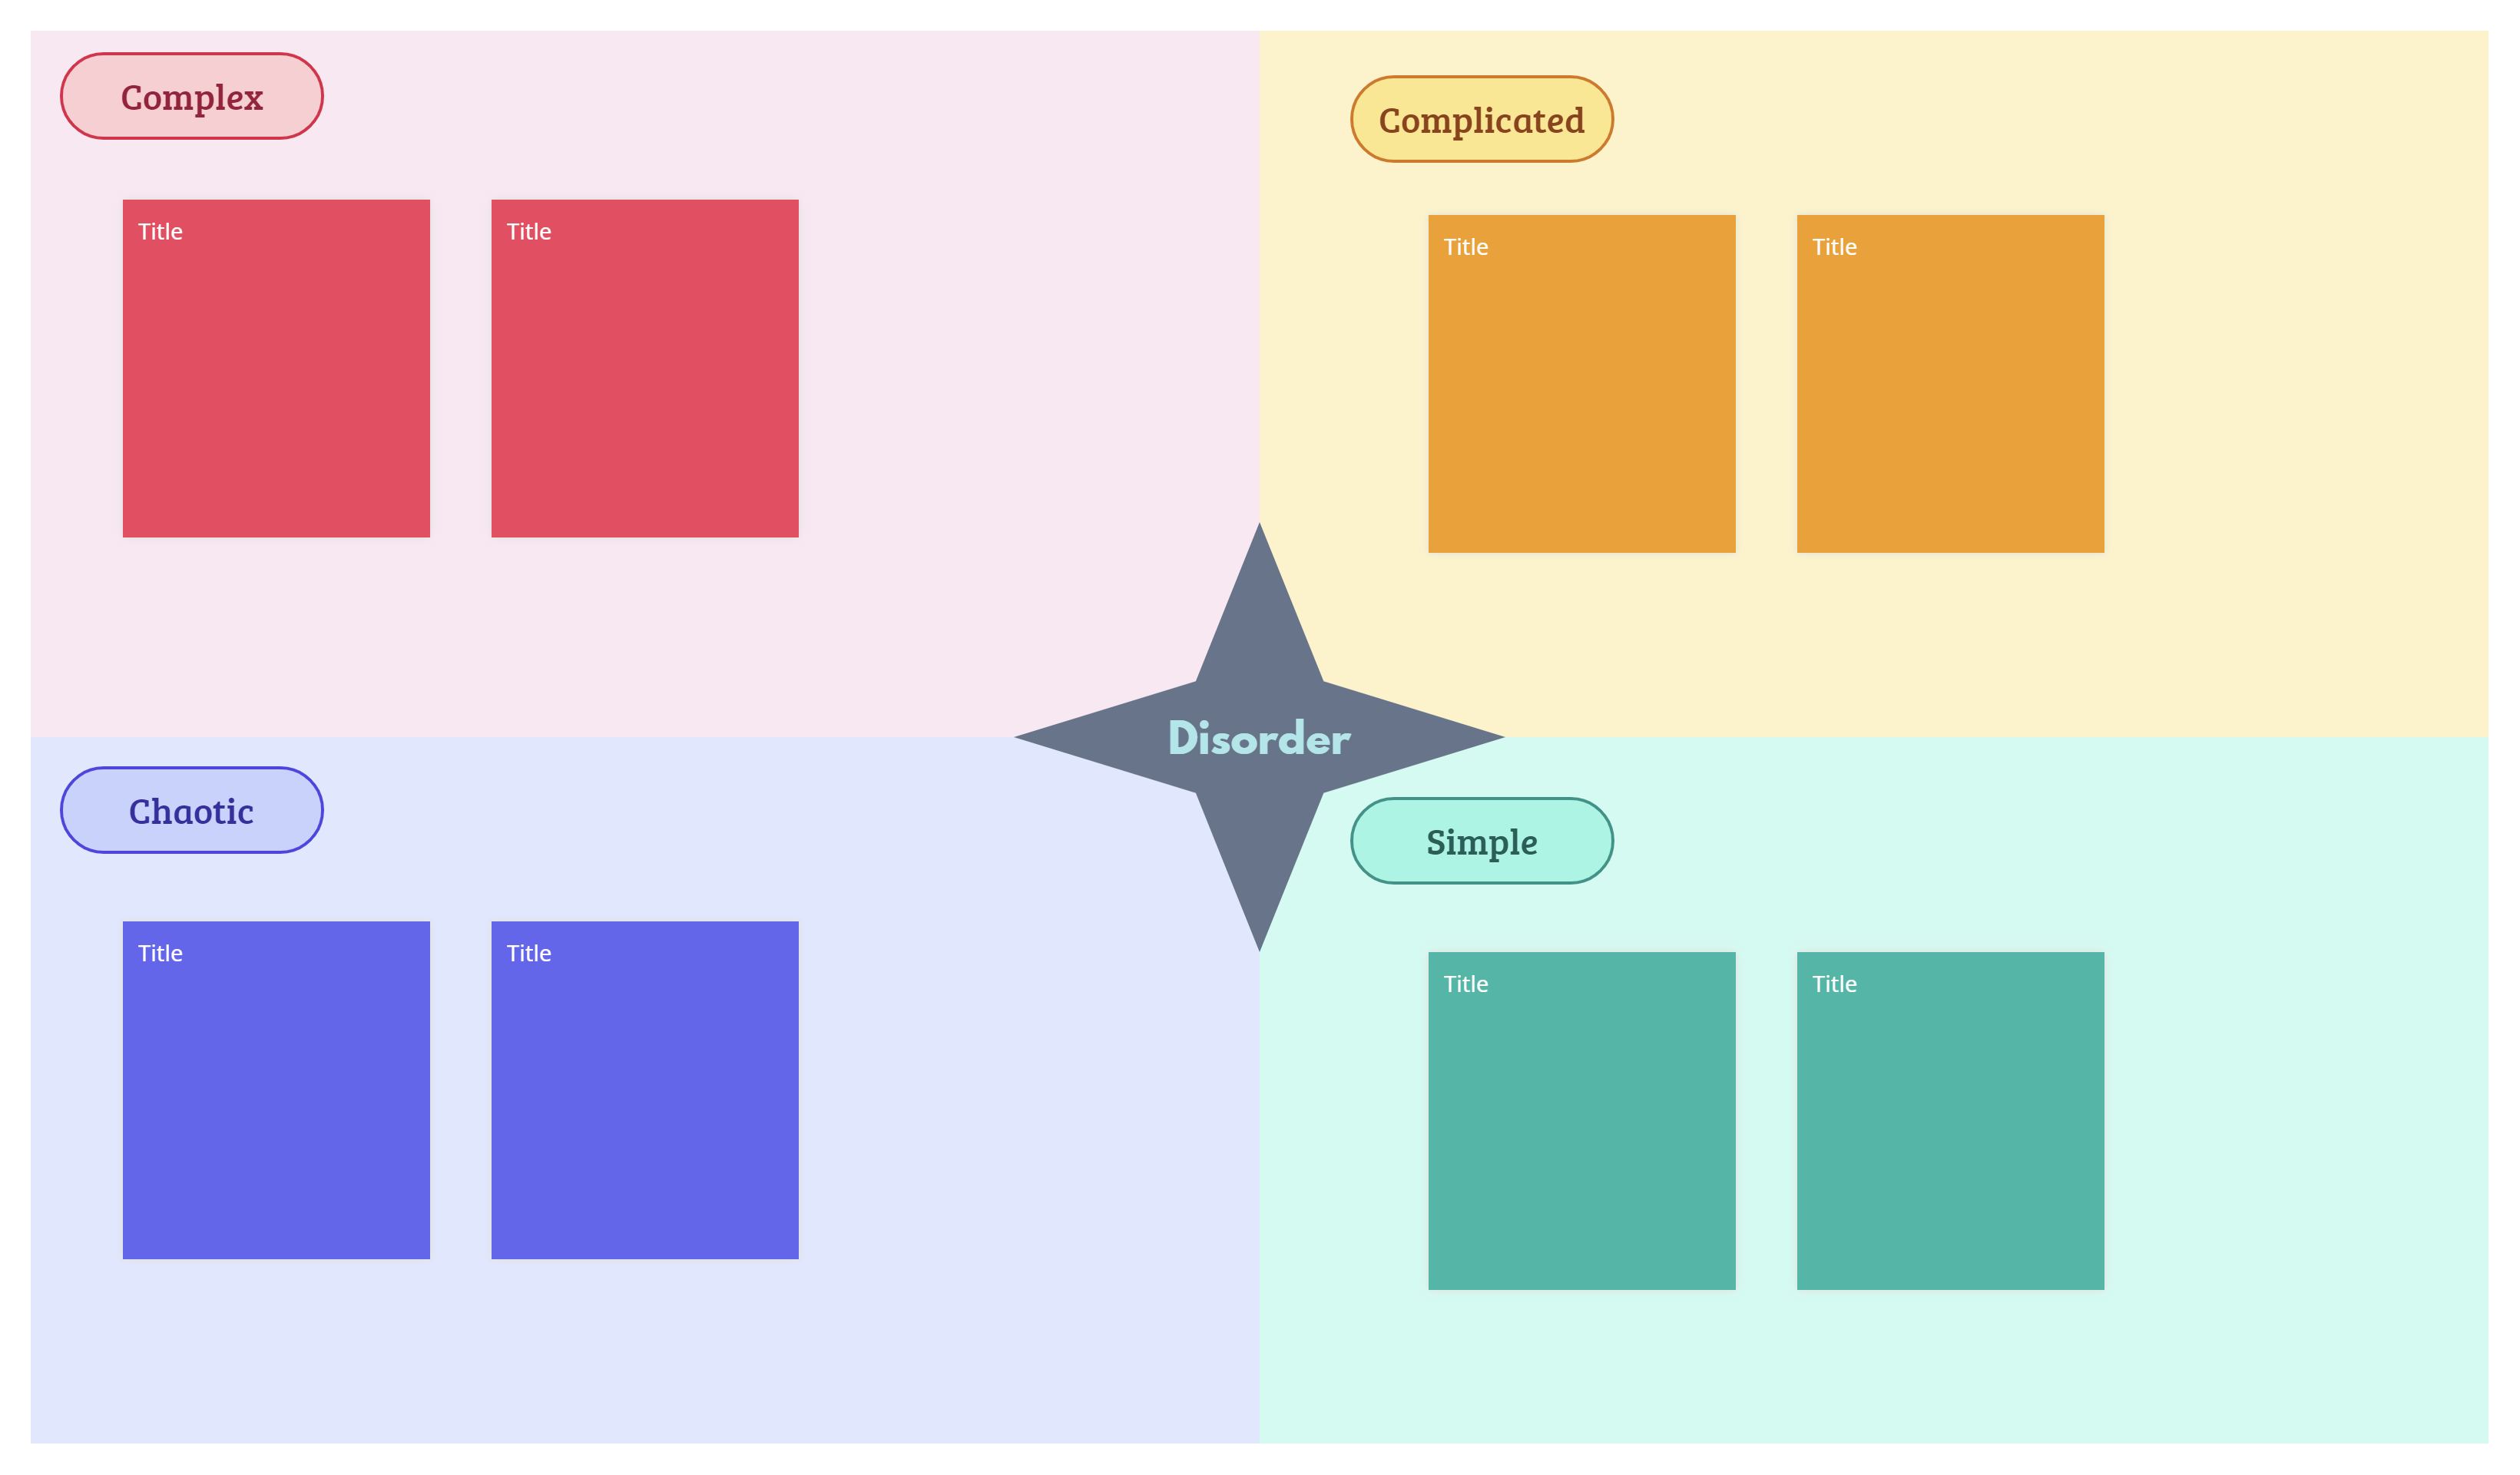
Cynefin Framework

The cynefin framework template is a powerful resource for project organization to help with making sense of complex situations. This template categorizes challenges into four domains: Complex, Complicated, Chaotic, and Simple. It offers a structured approach to understanding and addressing various project scenarios.

Here’s how to use the cynefin framework template:

  1. Recognize the challenge: Identify the challenge or issue you’re dealing with in your project. Understand its characteristics and how it affects your goals.
  2. Categorize into domains: Place the challenge into one of the Cynefin domains:
    • Complex: Problems with no clear cause-and-effect pattern, requiring experimentation and adaptability.
    • Complicated: Issues with discernible patterns, needing expertise and analysis for solutions.
    • Chaotic: Situations of unpredictability, where quick action is needed to restore stability.
    • Simple: Clear cause-and-effect relationships, allowing for standard best practices.
  3. Domain insights: Learn about the characteristics of the chosen domain. Understand how problems in that domain tend to behave and what approaches tend to work best.
  4. Choose strategies: Based on the domain, select suitable strategies to address the challenge. Different domains suggest different ways to approach, analyze, and resolve problems.
  5. Apply and monitor: Implement the chosen strategies to tackle the challenge. Monitor progress and be ready to adapt if the situation changes. If uncertainty arises, reassess the domain and adjust your strategy.
Click on the image to edit the cynefin framework

Timeline Workflow Template

The timeline workflow template is a valuable tool for project organization, as it helps with visualizing and managing project timelines effectively. This template provides a clear roadmap for tasks and milestones, improving project coordination and ensuring timely completion.

5 simple steps to use the timeline workflow template:

  1. List tasks and milestones: Begin by listing all the tasks and milestones that need to be completed for your project. Make sure to include both major milestones and smaller tasks.
  2. Arrange in sequence: Organize the tasks and milestones in chronological order. This helps you see the natural flow of the project and how tasks relate to one another.
  3. Assign durations: Estimate the time required for each task or milestone. This will help you create a realistic timeline for the entire project.
  4. Visualize the timeline: Use the template to create a visual representation of the timeline. You can use a Gantt chart or a simple chronological list to display the sequence and durations of tasks.
  5. Monitor and adjust: As the project progresses, regularly update the template to reflect the actual progress. If there are any delays or changes, adjust the timeline accordingly to keep everyone informed.

Click on the image to edit the timeline workflow template

Creately Template Roundup: July Week 3
round-up-blog-feature-july-week-3

In our last week’s roundup post, we shared several templates specifically designed to help project managers streamline their project workflows.

This week, we are focusing on templates for UX designers, product managers, project managers, and HR professionals. These templates will help them with planning, mapping, managing, and executing various tasks.

Check out our diagram community for more industry-specific templates and examples to support your day-to-day tasks.

This week’s templates include:

UX Research Plan Template

The UX research plan template is typically used for user experience (UX) and user research. It helps structure and plan research activities effectively, ensuring a user-centered approach in product development. This template further helps with defining research objectives, identifying target users, selecting appropriate research methods, and creating a timeline for the research process.
Here’s how to use the UX research plan template:

  1. Objective setting: Clearly define the research goals and objectives. Identify what insights you seek to gain from the research and how it aligns with the product development process.
  2. Participant identification: Identify the target audience and user groups for the research. Determine specific user personas or characteristics that will be included in the study.
  3. Method selection: Choose proper research methodologies and techniques that align with the research objectives. Common methods include interviews, surveys, usability testing, and observation.
  4. Timeline and schedule: Create a timeline that outlines the research activities and milestones. Allocate sufficient time for data collection, analysis, and reporting.
  5. Resources and logistics: List the resources needed for the research, such as tools, equipment, and participant incentives. Make sure logistics, such as participant recruitment and research environment, are well-organized.

Click on the image to edit the UX Research Plan Template

Skip-Level 1:1 Template

The skip-level 1:1 template is used by managers, team leads, or executives when conducting skip-level meetings. In these meetings, the manager meets directly with employees who are not their direct reports but work in different hierarchical levels within the organization.

This template facilitates effective communication and creates a safe space for direct reports to share feedback and ideas to improve the organization. It allows managers to gain unfiltered insights into the team dynamics and identify areas for growth and development.

5 simple steps to use the skip-level 1:1 template:

  1. Plan the meeting: Prepare a meeting agenda with topics you want to discuss, like team performance or challenges.
  2. Be friendly and open: Create a welcoming atmosphere to make direct reports comfortable sharing their thoughts.
  3. Ask questions: Use open-ended questions to encourage detailed responses. For example, “How do you think we can improve?” or “What challenges do you face?”
  4. Listen actively: Pay attention to what they say, don’t interrupt, and show empathy for their concerns.
  5. Take action: Based on their feedback, create an action plan to address issues and make positive changes.

Click on the image to edit the Skip Level 1:1 Template

User Story Map

The user story map template is an essential tool for UX designers involved in Agile product development. It allows UX designers to collaborate with cross-functional teams in visualizing and prioritizing user stories in a structured manner.

This template organizes user stories based on user needs and goals, providing a comprehensive overview of the product’s features and functionalities. With itUX designers can ensure a user-centric approach to design, aligning with user requirements and improving the overall user experience.

5 simple steps to use the user story map template:

  • Identify user goals: Begin by understanding the goals of the target users. Identify what problems they want to solve and the outcomes they expect from the product.
  • List user stories: Create a list of user stories that address each user goal. Each user story should represent a specific functionality or feature that fulfills a user’s need.
  • Arrange user stories: Organize the user stories in a logical sequence based on user workflow. This helps create a flow that aligns with the user’s journey through the product.
  • Prioritize and slice: Prioritize the user stories based on importance and impact. Divide larger user stories into smaller, manageable “slices” to facilitate iterative development.
  • Build the roadmap: Use the user story map to build a product roadmap. This roadmap will help guide the development process, ensuring that the team delivers value to users at every step

Click on the image to edit the User Story Map

Stakeholder Management Template

The stakeholder management template is useful for project managers to effectively manage stakeholders throughout the project lifecycle. It helps with identifying and analyzing stakeholders involved in the project, understanding their interests, and building strong relationships.

By using this template, project managers can ensure open communication, address concerns, and secure stakeholders’ support, ultimately leading to project success.

Here’s how to use the stakeholder management template:

  1. Stakeholder identification: Begin by identifying all stakeholders involved in the project or initiative. List both internal and external stakeholders, including individuals, groups, or organizations impacted by or impacting the project.
  2. Stakeholder analysis: Analyze each stakeholder’s interests, needs, and expectations. Identify their level of influence and potential impact on the project. This analysis helps prioritize stakeholders and tailor communication strategies accordingly.
  3. Engagement plan: Develop a stakeholder engagement plan based on the analysis. Define the frequency and mode of communication with each stakeholder, outlining the key messages and desired outcomes.
  4. Mitigating concerns: Address any potential conflicts or concerns that may arise during the project. Plan strategies to manage stakeholders’ conflicting interests and ensure their support throughout the project lifecycle.
  5. Continuous monitoring: Regularly review and update the stakeholder management template throughout the project. Monitor stakeholder dynamics, adapt engagement strategies as needed, and proactively address any emerging issues.
  6. Capture action items: At the end of the meeting, document any action items or follow-up tasks that arise from the discussion. Assign responsibilities and deadlines to ensure progress after the meeting.

Click on the image to edit the Stakeholder Management Template

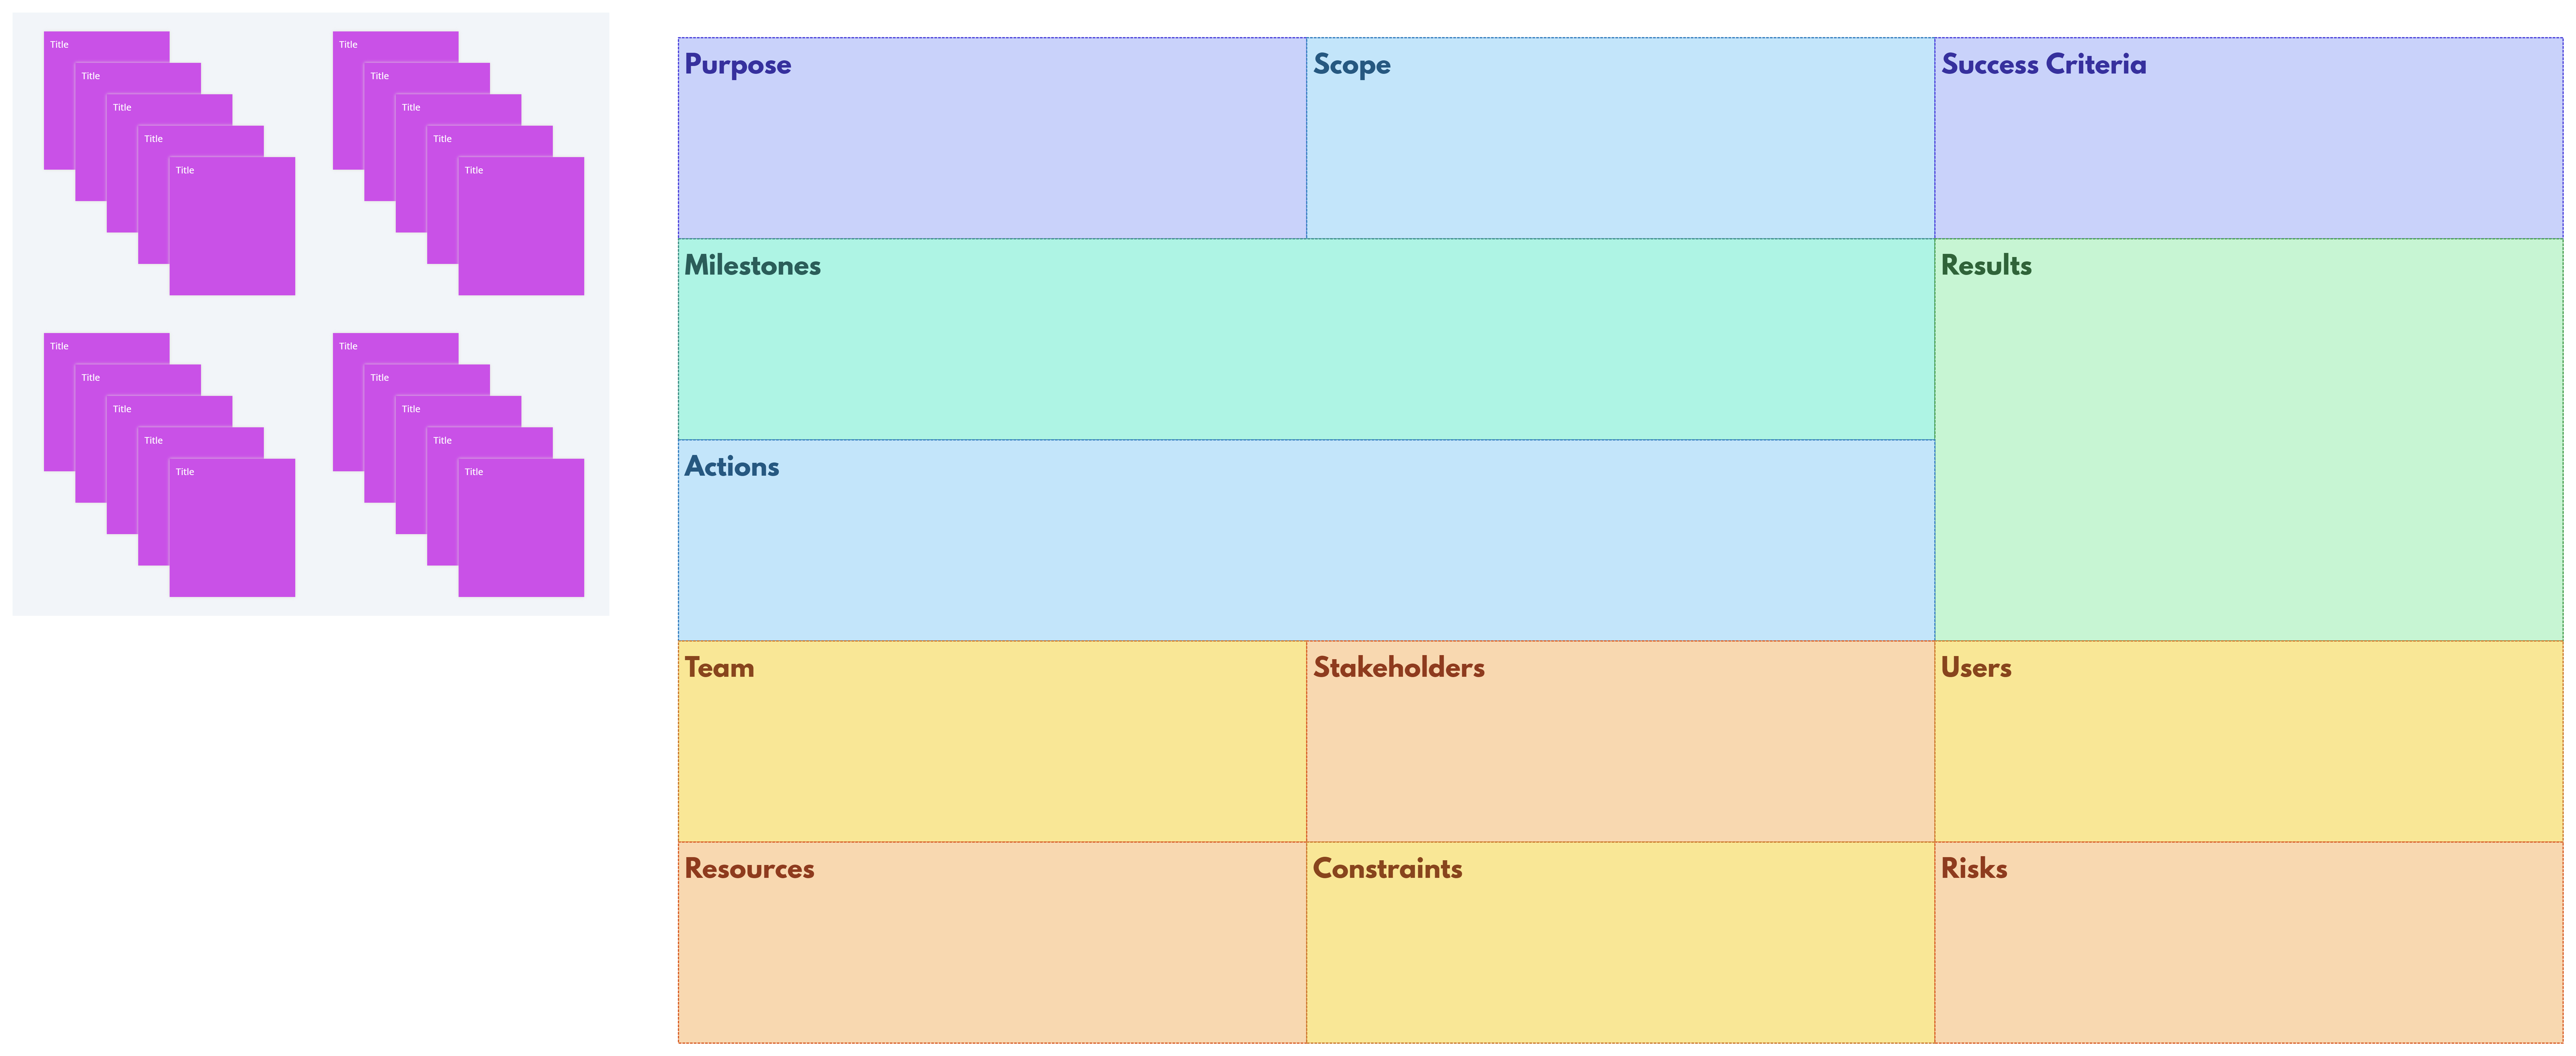
Project Canvas Template

The project canvas template is a powerful tool for project management and planning. This template provides a high-level overview of a project, capturing essential details and aligning team members on project goals. It is a concise and visual way to communicate project essentials, ensuring everyone is on the same page and working towards a common objective.

5 simple steps to use the project canvas template:

  1. Project purpose: Define the purpose and vision of the project. Clearly state the problem the project aims to solve or the opportunity it aims to capture.
  2. Key deliverables: Identify and list the primary deliverables the project will produce. These could be products, services, or outcomes that add value to stakeholders.
  3. Project scope: Define the boundaries of the project scope. Clarify what is included and what is not included in the project to prevent scope creep.
  4. Target users and stakeholders: Identify the target users or customers who will benefit from the project’s outcomes. Additionally, list the key stakeholders who will be impacted or have an interest in the project.
  5. Success criteria and risks: Set clear success criteria to measure the project’s performance. Define what success looks like and the metrics to evaluate progress. Also, identify potential risks that could impact the project and plan risk mitigation strategies.

Click on the image to edit the Project Canvas Template

Creately Template Roundup: July Week 1
july-week-1-feature

Did you check out our last week’s roundup post yet? We shared several useful templates tailored to meet the needs of event organizers, human resources professionals, public relations experts, and UX designers.

In this week’s post, we’ve got new templates specifically designed to meet the requirements of product managers. They help with tracking delivery dates, assessing consensus on various product options, providing problem-solving approaches, and organizing product strategy.

Do check out our diagram community if you’re looking for templates and examples for use cases in your industry.

This week’s templates include:

SAFe Program Board

The SAFe program board is an essential visual tool for agile teams in the Scaled Agile Framework (SAFe). It serves as a living document that allows teams to manage and track their progress during the Program Increment (PI). 

This board helps in visualizing dependencies, identifying potential risks, and promoting collaboration among teams. Product managers play a crucial role in managing the Program Board to ensure successful PI execution and alignment with strategic objectives. 

Here’s how to use the SAFe program board template:

  1. Gather the team: Bring together all team members and stakeholders involved in the PI.
  2. Define objectives and prioritize: Set clear PI objectives and prioritize work items based on importance.
  3. Visualize on the board: Use the Program Board template to map out and organize the work items.
  4. Update progress: Regularly move items on the board to reflect their progress – “To Do”, “In Progress”, “Blocked” or “Done.”
  5. Hold meetings: Conduct frequent meetings with teams to review the Program Board and address any issues.

Click on the image to edit the SAFe Program Board

Likert Scale Template

The Likert Scale template is used to gauge the level of agreement or satisfaction with specific product options. It empowers product managers to gather valuable insights from customers or team members and make data-driven decisions to enhance products. 

By leveraging the Likert Scale template, product managers can foster a deeper understanding of user preferences and sentiment, leading to more customer-centric product development and improved overall satisfaction.

Here are five simple steps to use this template:

  1. Define assessment goals: Clearly outline what you want to know about your product.
  2. Create the Likert Scale: Design simple questions with response options like “Strongly Disagree” to “Strongly Agree.”
  3. Gather responses: Share the survey with customers or team members.
  4. Analyze the data: Look for patterns and trends in the responses.
  5. Data-driven decisions: Use insights to improve your product and meet user needs better.

Click on the image to edit the Likert Scale Template

Opportunity Solution Tree Template

The opportunity solution tree template is a valuable tool that empowers product teams to improve their problem-solving approach and achieve desired outcomes efficiently. It enables product managers to identify opportunities, brainstorm solutions, and align efforts towards successful product development. 

Here’s how you can use the opportunity solution tree template:

  1. Identify opportunities: Search for areas where your product can be improved or innovative ideas can be applied.
  2. Brainstorm solutions: Gather creative and diverse ideas from your team to tackle the identified opportunities.
  3. Evaluate and prioritize: Assess potential solutions based on their practicality and the positive impact they can bring.
  4. Visualize the tree: Create a visual representation of the opportunities and corresponding solutions for clarity and easy communication.
  5. Action and iteration: Take action by implementing the chosen solutions and be open to refining your approach through iterative feedback and adaptation.

The opportunity solution tree template fosters a systematic and collaborative approach to problem-solving, empowering product teams to make informed decisions and achieve successful outcomes.

Click on the image to edit the Opportunity Solution Tree Template

Lightning Demo Template

The lightning demo template is a powerful tool that energizes teams through show-and-tell sessions, where members share inspiring examples found “in the wild” to fuel their own product ideation. Product managers can leverage this template to foster creativity and collaborative thinking, driving innovation in their product development process.

Here are five simple steps to effectively use the lightning demo template:

  1. Set the objective: Product managers begin by defining the objective of the lightning demo session. It could be exploring new features, user experiences, or innovative solutions relevant to the product’s goals.
  2. Gather inspirations: Encourage team members to search for inspiring examples from various sources such as websites, apps, or real-life experiences. These examples should relate to the objectives set earlier.
  3. Organize the session: Schedule the lightning demo session and ensure each team member has a brief time to present their inspiring findings. Keep the session lively and time-boxed to maintain energy and focus.
  4. Share the insights: During the lightning demo session, team members present their findings, explaining why they find each example inspiring and how it relates to the product’s goals. Encourage open discussion and questions.
  5. Derive insights for ideation: After the lightning demo, conduct a brainstorming session to derive insights from the examples shared. Product managers and the team can use these insights as springboards for ideation and product improvement.

Click on the image to edit the Lightning Demo Template

Product Brief Template

The product brief template is a comprehensive tool that outlines all the essential requirements, goals, and specifications needed to successfully build and launch a product. It helps product managers define the problem, address business and user needs, set clear success metrics, and identify potential risks.

Here’s how to use the product brief template:

  1. Identify the problem: Clearly state the problem the product aims to solve, backed by market insights and customer feedback.
  2. Address needs: Define the specific business and user needs the product will fulfill, ensuring a focus on value delivery.
  3. Set scope and exclusions: Specify the product’s boundaries, outlining what it will include and what it won’t to avoid scope creep.
  4. Measure success: Establish clear metrics to measure the product’s performance and validate assumptions, guiding data-driven decisions.
  5. Identify risks: Assess potential risks that could affect the product’s development or market success, preparing contingency plans to ensure a smoother journey.

Click on the image to edit the Product Brief Template

Creately Template Roundup: June Week 4
feature-june-week-4

In our most recent roundup post, we shared a collection of helpful templates designed to streamline the daily tasks of business consultants, scrum masters, human resources professionals, digital marketers, customer experience managers, and growth hackers.

And this week, our team has created five new templates that specifically cater to the needs of event organizers, human resources professionals, public relations professionals, and UX designers. These templates are designed to simplify their day-to-day tasks and boost their efficiency.

Explore our diagram community to access a wide range of templates that cover countless business use cases across diverse industries. This week’s templates include:

New Hire 1:1 Template

The new hire 1:1 template is a tool human resources professionals can use to effectively onboard and engage with new employees. It allows them to have structured and productive one-on-one meetings with new hires, ensuring a smooth transition and building a positive working relationship. Here are five simple steps to use the new hire 1:1 template:

  1. Introduction and rapport: Begin by introducing yourself and making the new hire feel welcome. Get to know them and their interests to build a positive connection.
  2. Review onboarding progress: Discuss how the new hire is progressing in their orientation and onboarding. Address any questions or concerns they have and provide helpful information.
  3. Set expectations and goals: Clearly communicate the performance expectations and goals for the new hire. Use the template to define objectives and align their efforts with the company’s expectations.
  4. Seek feedback and address concerns: Encourage open communication and ask for their feedback. Record their input using the template and promptly address any issues or concerns they may have.
  5. Plan for support and development: Collaborate with the new hire to identify areas for growth and provide resources or training to improve their skills. Show a commitment to their ongoing development and provide support when needed.

Click on the image to edit the New Hire 1:1 Template

Good Partner Map

The good partner map template helps teams understand and improve the value they bring to cross-functional partners. With this template, team members can build trust and build stronger, more mutually beneficial relationships with both internal and external partners. Here are five simple steps to use this template:

  1. Define your team’s value: On the left side of the map, clearly state who your team is, what value you bring, how you deliver it, and why partners should collaborate with you.
  2. Understand partner perspectives: Look at the center of the map to see how partners react and what they say. Understand their feedback, suggestions, and needs to see things from their point of view.
  3. Identify gaps and opportunities: Compare your team’s value with partner reactions. Find any differences or areas where you can improve to better meet partner expectations.
  4. Explore innovative solutions: Use partner feedback to think of new ways to strengthen relationships. Consider joint projects, collaborative initiatives, or better communication methods.
  5. Take action and monitor progress: Create an action plan based on what you’ve learned. Implement changes and keep track of how they impact partner relationships. Make adjustments as needed.

Click on the image to edit the Good Partner Map

Accessibility Personas

UX designers can use the accessibility personas template to understand and address the specific needs of diverse users in the accessibility environment. It helps designers to create inclusive experiences that cater to a wide range of users.  Here’s how to use this template:

  1. Identify user groups: Identify different user groups with disabilities or limitations that may interact with your product.
  2. Create personas: Use the template to create fictional personas representing each user group. Give them names and provide background information, including their skills, difficulties, and objectives.
  3. Define user characteristics: Fill out the template with details about each persona’s age, occupation, and technology proficiency.
  4. Understand user needs: Dive into the personas’ difficulties and challenges, identifying barriers they may face while using your product.
  5. Design inclusively: Use the insights gained from the personas to inform your design decisions. Consider the personas’ objectives, preferences, and limitations to create accessible and inclusive experiences.

Click on the image to edit the Accessibility Persona

Bracket Template

The bracket template is a useful tool for event organizers to manage and organize sports tournaments or competitions. They can use it to easily create and track brackets, ensuring smooth and efficient tournament operations.  Here are five simple steps to effectively use the bracket template:

  1. Define the tournament structure: Decide on the tournament format and choose the appropriate bracket layout.
  2. Enter participant information: Fill out the template with the names or teams taking part in the tournament.
  3. Seed the brackets: Assign seed numbers or rankings to participants to create fair matchups.
  4. Update match results: Record the outcomes of each match in the brackets as the tournament progresses.
  5. Communicate and share the brackets: Share the brackets with participants and spectators to keep them informed about the tournament’s progress.

Click on the image to edit the Bracket Template

Press Release Template

The press release template by Creately is a handy tool for public relations professionals to plan and structure their press releases efficiently. With this template, you can collaborate with your team and seamlessly incorporate essential content. Here are five simple steps to use the press release template:

  1. Write a catchy headline: Start by creating an attention-grabbing headline for your press release.
  2. Add key details: Include important information like the date, location, and a brief summary of the news or announcement.
  3. Craft the body content: Organize your press release into sections such as introduction, key points, supporting details, and conclusion.
  4. Include quotes or testimonials: Add quotes from relevant individuals to add credibility and interest to your press release.
  5. Review and refine: Collaborate with your team to review and make any necessary adjustments to ensure a clear and concise press release.

Click on the image to edit the Press Release Template

Creately Template Roundup: June Week 3

Last week we shared some useful templates that would help UX designers, product managers, project managers, content creators, quality controllers, and trainers streamline their workflows..

And this week our team has created five new templates that are useful for business consultants, scrum masters, human resources professionals, digital marketers, customer experience managers, and growth hackers to simplify their day-to-day tasks. 

Check out our diagram community for templates for 100s of business use cases spanning many industries.

This week’s templates include:

What? So what? Now what? Template

The “What? So what? Now what?” template is a valuable tool forbusiness consultants and project managers. It helps in analyzing situations, understanding their implications, and developing actionable steps to address them. 

Here are five simple steps to use this template:

  1. Identify the “What”: Clearly define and describe the current situation or issue. Gather relevant information and facts about it.
  2. Explore the “So what”: Dive deeper into the implications of the identified situation. Consider the potential consequences, impacts, and risks associated with it to gain a comprehensive understanding of the situation’s significance.
  3. Determine the “Now what”: Once you have a clear understanding of the situation and its implications, it’s time to develop an action plan. Outline the specific steps that need to be taken to address the situation effectively.
  4. Prioritize actions: Evaluate the outlined actions and prioritize them based on their urgency, feasibility, and potential impact. This step ensures that you focus on the most critical and impactful actions first.
  5. Implement and monitor progress: Put the action plan into motion and regularly monitor the progress. Track the implementation of the identified actions and assess their effectiveness. Make any necessary adjustments as you move forward.

Click on the image to edit the What? So what? Now what? Template

Mad Sad Glad Template

The Mad Sad Glad template is a common tool used by Scrum Masters, Agile Coaches, and team leaders to facilitate retrospectives or feedback sessions. It enables teams to reflect on their frustrations, disappointments, and positive experiences in a structured way.

Here are five simple steps to use this template:

  1. Set the stage: Create a safe and inclusive environment for the team to share their thoughts and feelings openly. Explain the purpose of the Mad Sad Glad template and how it will help the team reflect on their experiences.
  2. Identify the Mad: Invite team members to express what made them mad or frustrated during a specific project. Get them to highlight any obstacles, challenges, or issues that impacted their work negatively.
  3. Explore the Sad: Encourage team members to share what made them sad or disappointed. Discuss any missed opportunities, failures, or setbacks that affected their morale or progress.
  4. Discover the Glad: Shift the focus to the positive experiences. Invite team members to express what made them glad or brought them joy during the project. This could include successful outcomes, achievements, or moments of collaboration and support.
  5. Generate insights and actions: Review the Mad, Sad, and Glad inputs collectively. Identify common themes, patterns, or trends that emerge. From these insights, collaborate with the team to determine actionable steps to address the challenges, build upon successes, and improve team dynamics.

Click on the image to edit the Mad Sad Glad Template

Culture Design Canvas

The Culture Design Canvas is a tool used by organizational development consultants and human resources professionals to analyze and shape organizational culture. It provides a framework for exploring key aspects of culture and aligning stakeholders toward a desired culture.

Here’s how to use this template:

  1. Define purpose and values: Begin by clearly defining the purpose and core values of the organization. Discuss the overarching mission and the guiding principles that drive the organization’s culture.
  2. Explore rituals and behaviors: Identify the rituals, routines, and behaviors that are prevalent within the organization. This step involves examining how people interact, communicate, and collaborate. Assess whether these rituals and behaviors align with the desired culture.
  3. Assess symbols and artifacts: Symbols and artifacts represent the visible elements of culture, such as the physical workspace, logos, and company traditions. Evaluate the existing symbols and artifacts and consider their impact on the overall culture.
  4. Identify enablers and blockers: Look at the factors that support or hinder the desired culture. This step involves analyzing structures, systems, policies, and leadership behaviors that influence the organization’s culture. Identify what supports the desired culture and what needs to be addressed or changed.
  5. Design action steps: Based on the insights gained from the previous steps, collaborate with stakeholders to design actionable steps to shape the desired culture. Develop initiatives, programs, and interventions that align with the purpose, values, rituals, and behaviors identified earlier.

Click on the image to edit the Culture Design Canvas

AARRR Framework

The AARRR framework, also known as the Pirate Metrics, is a tool used by growth hackers, digital marketers, and product managers. It provides a systematic approach to analyze and optimize a startup or product’s growth.

Here are five simple steps to use this framework:

  1. Acquisition: Focus on acquiring new customers or users for your product or service. Identify the channels and strategies that attract potential customers and bring them to your website, app, or store.
  2. Activation: Once you have acquired users, the next step is to ensure they have a positive first experience with your product. Activate them by guiding them through the initial onboarding process and helping them understand the value your product offers.
  3. Retention: Encourage users to keep coming back and engaging with your product or service. Implement retention strategies such as personalized communication, valuable content, and regular updates to enhance user loyalty and reduce churn.
  4. Revenue: Generate revenue by monetizing your product or service. Identify different revenue streams such as subscriptions, advertising, or e-commerce transactions. Implement strategies to optimize your pricing, upselling, and cross-selling opportunities.
  5. Referral: Leverage satisfied customers to generate word-of-mouth referrals and expand your user base. Implement referral programs, encourage social sharing, and provide incentives for customers to recommend your product to others.

Click on the image to edit the AARRR Framework

Customer Touchpoint Map

The Customer Touchpoint Map is used by customer experience managers and user experience designers. It helps visualize and understand the various interactions a customer has with a company across different channels and touchpoints.

Here’s how to use this template:

  1. Identify touchpoints: Begin by identifying all the touchpoints where your customers interact with your company. These touchpoints can include your website, social media platforms, customer support, physical stores, email, and more.
  2. Understand customer journey: Map out the customer journey from the initial point of contact to post-purchase interactions. Understand the different stages and emotions customers experience along the way.
  3. Assess customer interactions: Evaluate the quality and effectiveness of customer interactions at each touchpoint. Consider factors such as ease of use, response times, clarity of communication, and overall customer satisfaction.
  4. Identify pain points and opportunities: Identify pain points or areas where customers may face challenges or frustrations. Look for opportunities to improve the customer experience, such as streamlining processes, enhancing communication, or adding value-added services.
  5. Optimize touchpoints: Develop strategies to optimize each touchpoint based on your findings. Implement improvements to enhance customer satisfaction, align touchpoints with your brand promise, and provide a consistent and seamless experience.

Click on the image to edit the Customer Touchpoint Map

Creately Template Roundup: June Week 2
roundup-june-week-2-feature

Last week, we shared customized templates for those who are engaged in event planning, product management, career counseling, cultural anthropology, and personal productivity coaching.

This week we have prepared five brand-new templates tailored specifically for UX designers, product managers, project managers, team leaders, content creators, quality controllers, professional trainers and consultants.

If you’re interested in exploring additional templates, we encourage you to visit our diagram community, where you can find an extensive collection of hundreds of templates catering to a wide range of organizational use cases.

This week’s templates include:

Lean UX Canvas

The Lean UX canvas is a visual tool used in the field of User Experience (UX) design to facilitate the collaborative creation and communication of product concepts. It is typically utilized by UX designers, product managers, and cross-functional teams working in an agile and iterative environment.

Using a Lean UX canvas template can help streamline the design process and align team members on the project’s goals and user-centric approach. 

Here’s a simple guide on how to use a Lean UX canvas template in five easy steps:

  1. Define the problem: Clearly identify and frame the problem you aim to solve, considering user needs and business objectives.
  2. Identify target user personas: Define the primary target users for your product and create user personas representing their characteristics, behaviors, and goals.
  3. Map the user journey: Visualize the user’s experience by mapping out their journey from the first interaction to achieving their goals, including touchpoints, emotions, and pain points.
  4. Generate solution ideas: Brainstorm potential solutions to address the defined problem and meet user needs, encouraging diverse perspectives from team members.
  5. Formulate hypotheses and validate: Create hypotheses about the solutions generated and design experiments to test these assumptions with users, focusing on iterative cycles of feedback, learning, and refinement.

Click on the image to edit the Lean UX Canvas

Pre-Mortem Template

The pre-mortem template is a strategic tool used by project managers, team leaders, and decision-makers to anticipate and mitigate potential risks or failures before they occur. It is particularly valuable during the planning phase of a project or initiative.

Here’s how to use the pre-mortem template in five easy steps:

  1. Set the stage: Gather the project team or relevant stakeholders and explain the purpose of the pre-mortem exercise. Emphasize the importance of identifying risks and potential failures to prevent them from happening.
  2. Imagine failure: Ask participants to imagine that the project has already failed or encountered significant problems. Give them a specific timeline, such as six months or a year into the future. Encourage them to think broadly and creatively about all the possible reasons for the failure.
  3. Brainstorm risks and causes: Provide each participant with sticky notes or a digital platform where they can individually write down risks and causes they believe could contribute to the failure. Give them a set amount of time to generate as many ideas as possible. Remind them to focus on specific risks rather than generalities.
  4. Share and group ideas: Have each participant share their ideas one by one, allowing for discussion and clarification if necessary. As ideas are shared, group similar or related risks and causes together. This step helps identify common themes and prioritize potential risks.
  5. Mitigation strategies: Once all ideas are shared and grouped, shift the focus to developing strategies to mitigate or prevent the identified risks and causes. Encourage the team to brainstorm proactive actions, contingency plans, or risk mitigation measures that can be implemented to minimize the likelihood or impact of the identified risks.

Using the  a pre-ortem template, project teams can proactively identify potential risks and failures, enabling them to develop strategies and contingency plans to prevent or minimize their impact. This exercise promotes a forward-thinking approach and enhances the overall project planning and risk management processes.

Click on the image to edit the Pre-Mortem Template

Content Repository Template

The content repository template is a tool commonly used by content managers, digital marketers, and editorial teams to organize and manage their content assets effectively. It provides a centralized location to store, categorize, and access content for various channels and platforms.

Here’s how to use the content repository template:

  1. Set up the template: Create a structured framework within the repository, including folders, categories, and metadata fields, to organize the content effectively. Consider factors like content type, topic, target audience, and publication date.
  2. Upload and categorize content: Begin by uploading existing content assets into the repository. Assign appropriate categories, tags, and metadata to each piece of content for easy search and retrieval. This step ensures content is properly organized and accessible.
  3. Define permissions and access levels: Determine who can access and edit the content within the repository. Establish user roles and permissions to maintain data security and ensure the right individuals have the necessary privileges.
  4. Collaborate and track revisions: Encourage collaboration among team members with features like version control. Track revisions, comments, and feedback within the repository to maintain a transparent workflow and streamline content development and approval processes.
  5. Search and retrieve content: Use the repository’s search functionality to locate specific content based on relevant criteria, such as keywords, categories, or metadata. Ensure the repository is easily accessible and user-friendly for efficient content discovery and retrieval.

Use the content repository template to efficiently manage and organize content assets, enhance collaboration among team members, and streamline the content creation and publication processes.

Click on the image to edit the content repository template

Risk Matrix

A risk matrix template is a tool commonly used by project managers, risk managers, and decision-makers to assess and prioritize risks based on their likelihood and impact. It provides a structured framework for evaluating and visualizing risks, enabling effective risk management and mitigation strategies.

To use a risk matrix template, follow these five easy steps:

  1. Set up the template: Begin by selecting a risk matrix template that suits your needs. This can be a pre-designed template or a blank matrix that you customize. Set the axes for likelihood and impact, and define the rating scales for each criterion.
  2. Identify and assess risks: Identify potential risks associated with your project or initiative. Evaluate each risk by considering its likelihood of occurrence and the potential impact it may have on project objectives. Use the rating scales defined in the template to assign scores to each risk.
  3. Plot risks on the matrix: Use the likelihood and impact axes in the template to plot each identified risk. The likelihood is typically represented on the horizontal axis, and the impact is represented on the vertical axis. Place each risk at the intersection that corresponds to its assessed likelihood and impact scores.
  4. Determine risk levels: Analyze the positions of the risks on the matrix to determine their overall risk levels. Typically, risks in the high-likelihood and high-impact zone (top-right quadrant) are considered high-risk and require immediate attention. Risks in the low-likelihood and low-impact zone (bottom-left quadrant) are typically lower priority.
  5. Prioritize risk mitigation: Based on the risk levels identified, prioritize the risks for mitigation efforts. Focus on high-risk areas first and allocate appropriate resources to develop and implement mitigation strategies. Monitor and review the matrix regularly to update risk assessments and adjust mitigation efforts as needed.

The risk matrix template enables you to effectively visualize and prioritize risks, leading to informed decision-making and targeted risk mitigation. It also provides a clear framework for assessing and managing risks throughout the project lifecycle, ultimately enhancing project success and minimizing potential negative impacts.

Click on the image to edit the risk matrix

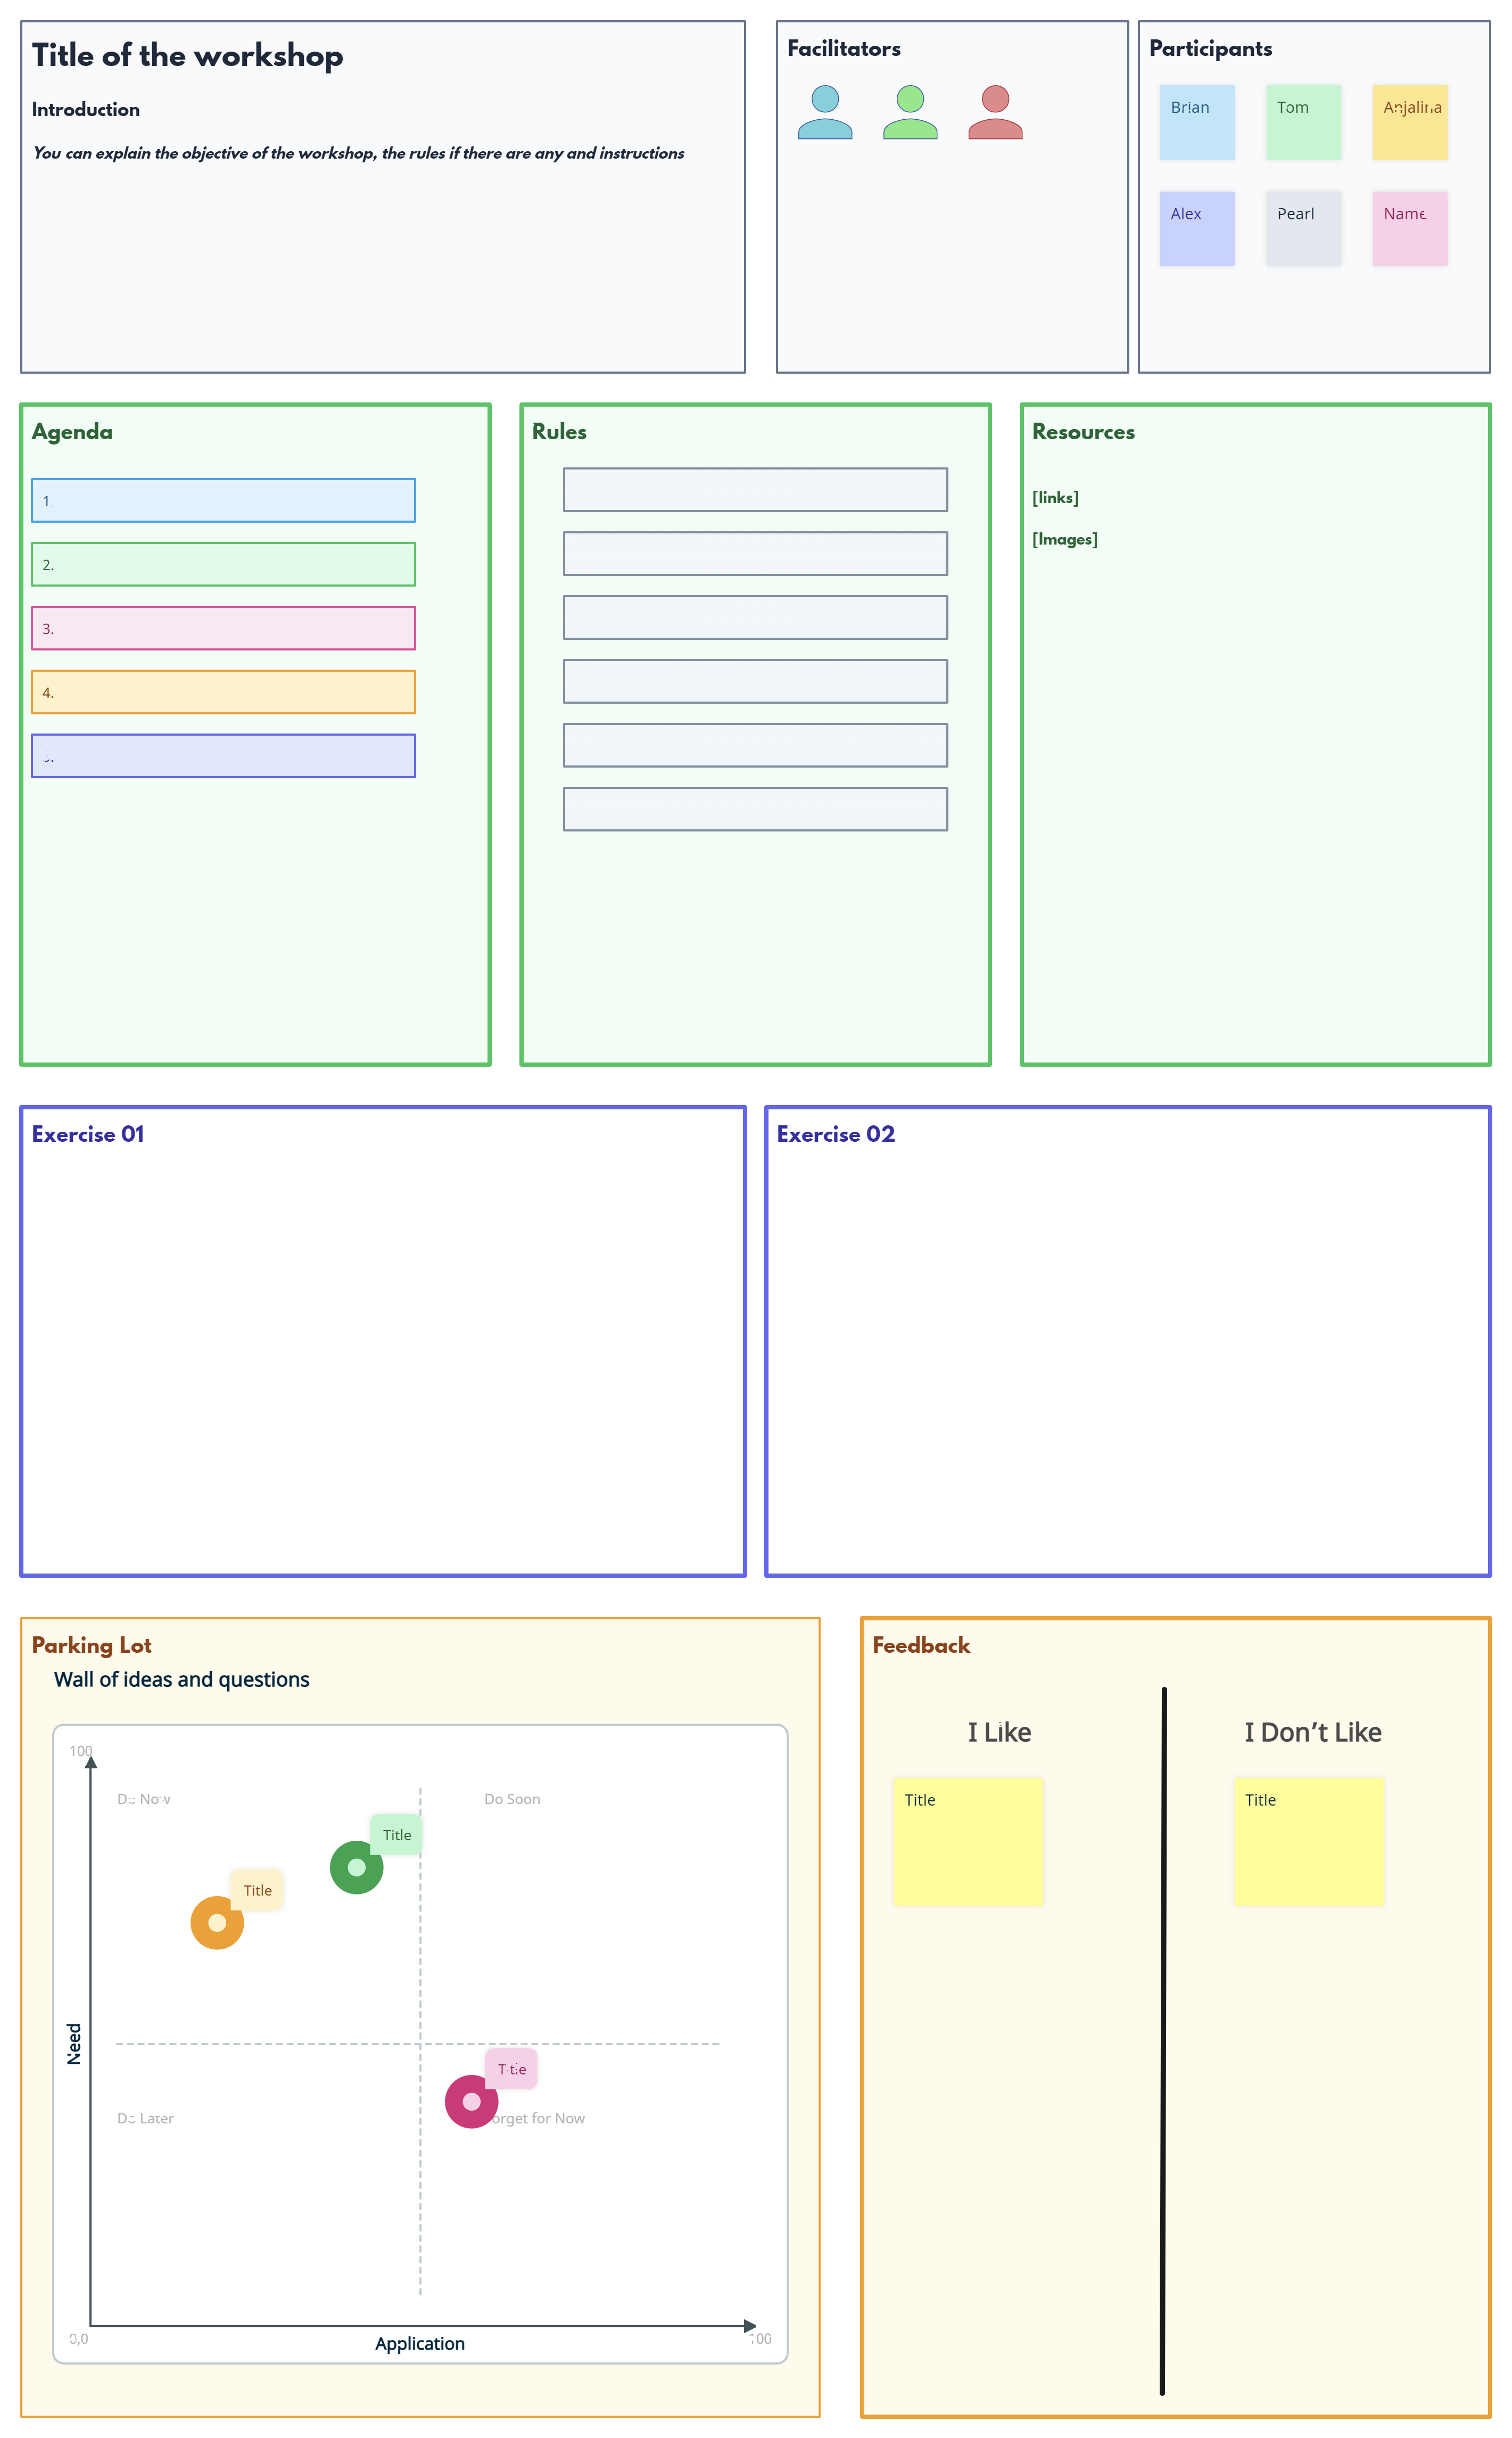
Effective Workshop Template

An effective workshop template is a structured tool used by facilitators, trainers, and professionals from various fields to plan and conduct productive workshops. It provides a framework for organizing and guiding workshop sessions to achieve specific goals and outcomes.

Follow these steps to use the workshop template:

  1. Define workshop objectives: Clearly articulate the purpose and desired outcomes of the workshop. Identify the specific goals you aim to achieve and the knowledge, skills, or actions you want participants to gain.
  2. Plan the agenda: Develop a detailed agenda that outlines the flow of activities, topics to be covered, and allocated time for each session. Consider incorporating a mix of presentations, interactive exercises, group discussions, and hands-on activities to engage participants and achieve the workshop objectives.
  3. Prepare materials and resources: Gather and prepare all necessary materials, resources, and handouts required for the workshop. Ensure that participants have access to relevant documents, worksheets, or tools that support their learning and engagement.
  4. Facilitate engagement and participation: During the workshop, use the template to guide your facilitation approach. Encourage active participation, group collaboration, and open discussions among participants. Employ interactive techniques, such as brainstorming, group work, and role plays, to foster engagement and knowledge sharing.
  5. Evaluate and gather feedback: At the end of the workshop, allocate time to collect feedback from participants. Use evaluation forms or surveys to gather their insights on the workshop content, facilitation, and overall experience. This feedback will help you assess the effectiveness of the workshop and make improvements for future sessions.

By using an effective workshop template, professionals can structure and facilitate engaging and impactful workshops. The template serves as a guide to ensure that the workshop objectives are met, participants are actively involved, and the desired outcomes are achieved. It helps streamline the planning and execution process, resulting in a valuable and successful workshop experience for all involved.

Click on the image to edit the effective workshop template